Field Beans - Production
Herbicide Recropping Information
Bean Varieties
Field beans will grow on virtually any soil in Manitoba; however flat, well-drained land, free of stones, is ideal. Beans do not tolerate standing water. On average, moisture is adequate across all of Manitoba for producing beans.
Most pinto and black bean varieties and the shorter season navy (white pea bean) varieties will mature in 90 to 100 days. Kidney and cranberry beans require an extra 10 to 14 days to reach maturity, and should be grown only in south-central Manitoba and with growers with specialized bean harvesting equipment.
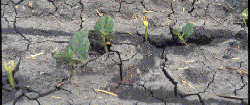
Beans are a warm-season crop. The optimum temperature for growth is 24° C, and temperature extremes can result in reduced growth.
Temperatures greater than 30° C can cause flower blasting (dropping of buds and flowers). Field bean growth and development stops when temperatures drop below 10° C.
Field beans can be generally classified as either bush or vine types. Bush-type varieties have determinate growth patterns making them suitable in solid-seeded (narrow row) production systems. Determinate growth means that the bean plants stop producing new leaves (growing vegetatively) once the flowers have developed. Vine-type field bean varieties have indeterminate growth, meaning they continue to grow, flower and set pods as long as temperature and moisture permit.
Field beans are very susceptible to spring frost damage and should be planted between the third week of May and first two weeks of June. Planting later can result in beans not maturing or may not be insured by Manitoba Agricultural Services Corporation (MASC).
Variety trials are conducted annually by Manitoba Pulse Soybean Growers. Seed Seed Manitoba for more information on variety performance by location.
 |
Great Northern Other Names: Large White Seeds/100g: 280-330 |
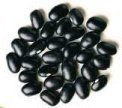 |
Black Turtle |
 |
Pink Seeds/100g: 330-400 |
 |
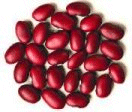
Dark Red Kidney Seeds/100g: 150-200 |
 |
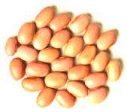
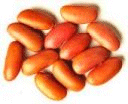
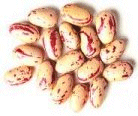
Pinto Seeds/100g: 260-300 |
 |
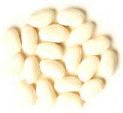
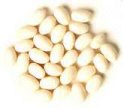
White Kidney Other Names: Alubia Seeds/100g: 150-200 |
 |
Light Red Kidney Seeds/100g: 170-220 |
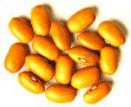 |
Dutch Brown Seeds/100g: 210-300 |
 |
Small Red Other Names: Red Mexican Seeds/100g: 275-330 |
 |
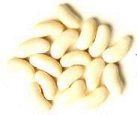
White Pea Other Names: Navy, Alubias Chica Seeds/100g: 450-525 |
 |
Cranberry Other Names: Romano, Speckled Sugar Seeds/100g: 145-225 |
Note: Photos courtesy of Pulse Canada | |
Input Costs
Field beans require a significant investment in management skills and operating costs. Please refer to the Guidelines For Estimating Crop Production Costs
Good planning and in-season scouting and management are essential. Use Manitoba Agriculture's Field Scouting Guide and the Guide to Field Crop Protection for current recommendations.
Field Selection
Beans can be successfully grown on heavy or light soils. Heavy soils that are often poorly drained, can limit yields, while coarse textured soils that are often prone to drought, can also limit yields. Soils with high pH can cause zinc deficiencies, which can be remedied through zinc application at planting.
1. Drainage
Field beans will not tolerate wet soil. Wet soils may also be associated with salinity, which also affect field beans. Saturated soil conditions for a 24-hour period will stunt plants. If the plant survives an extended flooding period prior to pod setting, maturity is usually delayed. If the plant is near maturity, the stress of standing water will likely kill the crop. If the seeds are not yet filled, smaller, lighter and shrivelled seeds will result. Too many of these seeds will downgrade the sample.
2. Previous crops
Field beans are susceptible to white mould (sclerotinia) and fields with a recent history of sclerotinia-susceptible crops such as potato, canola, sunflower, peas, fababeans, buckwheat and safflower should be avoided. The sclerotia requires about four years to break down. Spores that cause sclerotinia can blow in from neighbouring fields. Sclerotinia can be managed with a fungicide application.
3. Stones
Stones need to be rolled prior to seeding or before bean emergence. Once the beans have emerged rolling will knock off the cotyledon, killing the plant. When growing beans in a row crop system, stones can make under cutting difficult, but not impossible. Excessively stony fields may be best suited to solid-seeded bean production where the beans are direct combined.
4. Herbicide History
Field beans are very sensitive to a number of herbicide residues. Be aware of cropping restrictions if the following products have been used on fields targeted for beans. Check Manitoba Agriculture's current Guide to Field Crop Protection for detailed information on recropping restrictions. Herbicide residues can be managed, but it requires good record keeping, planning and knowing which herbicides leave residues.
Seeding
Certified disease-free seed of high germination should be used to avoid seed-borne diseases such as bacterial blight. Seed must be handled carefully to avoid mechanical damage leading to baldhead, a non-disease condition where the growing point of the seedling fails to develop.
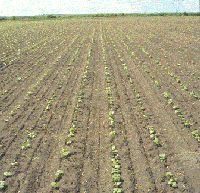
In Manitoba, field beans have traditionally been grown as a row crop, in rows spaced 30-36 inches apart. However, producers accustomed to growing cereals, flax and canola are starting to look at field beans as an alternative crop. Many of these producers are only interested in field beans if they can use their existing equipment (air seeders, sprayers and combines) to grow the crop. Field beans planted with air seeders will be grown in rows five to eight inches apart (solid seeded). Changing the row width can affect varieties chosen, weed control, and harvest equipment. Since there are significant differences in the cultural practices used in growing field beans as a row crop or solid seeded, these two bean production systems are described separately.
Row Crop Production System
Planting
Field beans are grown in rows set 30 to 36 inches apart and because of this, specialized row crop equipment set up for the specific row width is needed. Sugar beet equipment can also be modified to grow field beans on 22 inch rows. Using row crop production, navy beans are seeded at 100,000 viable seeds per acre, which is approximately 18 viable seeds per metre of row or 40-50 lb/acre depending on the 100 g seed weight (seed size) of the variety. Field beans are seeded with a row crop planter (e.g. John Deere Maxemerge) or a special bean planter. The individual bean plants are much closer together within the row, creating competition for water, nutrients and light. In heavier clay soils, this closer spacing of bean plants can help the beans emerge if the soil gets crusted due to a heavy rain, after planting. Field beans need to be planted in moist soil. A uniform seeding depth of 3-5 cm is important. For beans grown under row crop production, the following table lists the general seeding rates for five different types of field beans grown in south-central Manitoba when seeded at a target population of 100,000 plants/acre. |
| |||||||||||||||||
|
Cultivating weeds between the rows (inter-row cultivation) can be very effective in controlling weeds. Damage to beans is minimized if the inter-row cultivation is done during warm days when bean plants are slightly wilted and less susceptible to breakage. Weeds dislodged between the rows will also wilt and die quickly.
Fields can be cultivated as often as three times per growing season, but twice is most common. The first cultivation should occur when the beans are at the second trifoliate stage (see Figure 1) and the weeds are small. During this first cultivation, a post emergent in-crop herbicide can also be applied as a band over the beans to control weeds within the row. This practice will reduce herbicide costs because only about a third of the field is actually sprayed. In subsequent cultivations use caution, as close cultivation can prune shallow roots when the bean plants are larger. Do not cultivate beans when the leaves are wet, as this can spread diseases throughout the field.
Inter-row cultivation can be used to aerate the root zone and to hill the bean plants. After a heavy rain which may crust the soil, surface aeration is often recommended to replenish the soil's oxygen supply. Hilling can also reduce damage from root rot, because lateral roots can form in the soil hilled up around the base of the plants.
Row cropping can also allow for the use of drop nozzles for fungicide application to control white mould (sclerotinia).
The greatest difference between the two production systems occurs at harvest. Beans grown in rows are pulled, windrowed and then combined using a pick-up header. The standing beans are "pulled" by cutting the stem just below the soil surface with a fixed blade, rod weeder or rotary disk-type puller. The pulled beans are then left to cure in windrows. Pulling and windrowing can be done in one operation with suitable equipment. At harvest the windrows are lifted into the combine using a SUND or RAKE UP pick-up. When beans are pulled before combining, pod height above the ground is not as critical as it is in a solid-seeded system.
Solid Seeded Production Systems
Producers currently growing cereals, flax and canola can grow field beans with only slight modifications to their existing equipment. Field beans planted with air seeders will grow in rows five to eight inches apart (solid-seeded). Growing solid-seeded field beans compared with row-cropped beans requires slightly different production practices. Solid-seeded production can affect variety, chosen, weed control, disease control and harvest practices.
| Row width (inches) | Populations/acre (000's) | Plants per foot of row | lb/acre* |
| 7 | 160-170 | 2.25 | 70-75 |
| 14-15 | 130-150 | 3.0-4.0 | 60-70 |
| 20-22 | 110-130 | 3.5-4.5 | 50-60 |
| 30 | 100 | 6 | 40 |
Plant populations required for navy beans seeded at various row widths, based on information from Ontario and North Dakota.
Field bean seeds are subject to a condition called baldhead. Baldhead is caused by mechanical damage when the seed has been handled roughly. To reduce baldhead when seeding field beans with a conventional air seeder, slow down the fan speed (air flow) to reduce the amount of seed injury to acceptable limits. Air flow should be cut back as much as possible, while still maintaining uniform seed distribution across the width of the seeder.
When planting field beans, it is best to target a specific final plant population that takes into consideration the percent germination and size of the seed.
The narrower row spacing associated with solid-seeded bean production means that the beans are not planted as close together in the row. This results in the plants being spread out more uniformly over the field than with beans under row crop production.
In order to take advantage of this reduced competition, plant populations are increased in solid-seeded production systems. Recent research in Ontario and North Dakota shown in the above table describes the target plant populations for navy beans at four different row widths ranging from seven to 30 inches. This higher seeding rate means that seeding costs in solid-seeded beans are higher than in row cropped beans.
Solid-seeded bean production requires a determinant, bush type bean plant. At harvest, these bush-type plants tend to stand up better (lodge less) resulting in the pods being held higher off the ground allowing a cutter bar to get below them with "acceptable" losses. To date, some varieties of navy and black beans have this bush-type growth and are suitable for solid-seeded production. For bean varieties and variety characteristics, refer to the current publication of Seed Manitoba. Pinto beans generally have a viney-growth habit, which causes the pods to set too low to the ground for direct harvesting. However, new pinto bean varieties being developed by the Crop Development Centre at the University of Saskatchewan are more upright, and thus more suitable for direct harvesting.
Weed Management
Although inter-row cultivations are given up in a solid seeded system, the crop is more competitive with weeds when planted in the narrower rows and at higher plant populations. In-crop herbicides in field beans are limited and lack of weed control options is one of the greatest obstacles to overcome in a solid seeded production system. Choose fields wisely to ensure weeds can be controlled and refer to the Guide to Field Crop Protection for options.
Under favourable environmental conditions for white mould (sclerotinia stem rot), narrow row spacings will limit the amount of air movement through the leaf canopy, favouring disease development compared with row-cropped beans. The use of tramlines in solid-seeded beans for pesticide applications will reduce plant trampling and subsequent delay in maturity of the trampled plants.
Solid-seeded beans can be harvested by either swathing with lifters ahead of the combine or direct combining, using lifters, flex header or all-crop header. Success depends on selecting a bean variety that stands up well, and sets pods higher on the plant. Swaths should not be left on the field for too long as they can be scattered by the wind.
Pods that are below the cutter bar will be missed in the swathing or direct-harvesting operation. Solid-seeded harvest losses due to shattering can be higher than with the row-cropped method of harvesting. MCIC data from 1990 shows that with row cropping, yield losses with direct combining were higher than the traditional harvest practice of pulling the beans and windrowing .
However, better variety selection, narrow rows, the use of a crop desiccant and swathing at higher seed moisture content (20 per cent) can overcome some of these losses.
| Harvest Method | Average Loss | Minimum | Maximum |
| Straight cut | 229 | 55 | 1060 |
| Windrowed | 97 | 22 | 311 |
- Require a change in seeding rates
- Complicates the use of inter-row cultivation for weed contro
- Creates a more favourable environment for disease development
- Requires direct combining or swathing at harvest
| Row Crop | Solid Seeded | |
| Equipment | special row crop | standard grain equipment |
| Row Width | 22 to 36 inch | 5 to 8 inch |
| Plant Population | 100,000 plants/acre | 120,000 plants/acre |
| Disease Control | band/broadcast sprays | broadcast spray |
| Weed Control | inter-row cultivation(s) and/or herbicide | herbicide |
| Harvest System | pull and windrow | direct combine |
Field Bean Fertility
The proper strain of rhizobium for dry beans is Rhizobium phaseoli. Inoculants are available in several formulations. Powdered peat inoculants are applied directly to the seed, but require a sticker agent.
Liquid inoculants of rhizobia are applied directly to the seed and usually contain a sticker. Follow manufacturers' instructions for proper application of inoculant.
All inoculant sold in Canada is registered under the Fertilizers Act, and Agriculture and Agri-Food Canada tests inoculants regularly to ensure they meet the guaranteed number of bacteria stated on the label.
The inoculant contains live cultures of bacteria and should be kept refrigerated or cool and moist and out of direct sunlight.
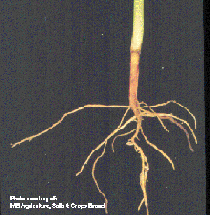
To assess the effectiveness of rhizobium nodules after planting, dig plants and examine the roots. Effective nodules will be a pink colour when sliced open. Ineffective nodules are pale green or white inside. Generally, nodulation is visible one month after seeding, and the number of nodules increases until flowering. Plants stressed by weather or disease may not nodulate. High levels of soil nitrogen may inhibit nodule formation and activity. Inhibition of nodules occurs as soil nitrate-N levels rise above 35 lb/acre, and little fixation occurs with soil nitrate-N levels exceeding 55 lb/acre.
Inoculated field beans have responded to fertilizer nitrogen under certain conditions in Manitoba trials. The plant requires approximately 15 lb/acre of nitrogen from the time of seeding to nodule fixation of nitrogen, which takes about one month. Yield increases with applied nitrogen is likely when:
- Soil nitrogen is low in the spring (less than 35 lb/ac in 0-24" depth);
- Spring soil temperatures are below average;
- Seed yield expectations are high (exceeding 1,800 lb/ac);
- Root efficiency is impaired by root rot.
Under these conditions, consider applying nitrogen at 20-40 lb/acre.
Excessive nitrogen applications may cause increase foliage growth and disease severity (especially white mould), delayed maturity and reduced effectiveness of rhizobium.
Phosphorus (P2O5)
Beans have not responded well to applied phosphorus in Manitoba. However, it is well recognized that good yields of beans are usually associated with high levels of available phosphorus in soils. It appears that residual effect of phosphate fertilization is more important for beans than direct phosphorus fertilization. Each hundredweight of beans removes 1.25 lb of P2O5. Refer to the following table for recommended phosphorus application rates and placement for beans.
Phosphorus fertilizer recommendations using the sodium bicarbonate (Olsen) method.
| Soil P Content | P2O5 Recommendation lb/acre (Narrow row spacing only) | ||
| (ppm in 0- 6 inch depth) | Rating | Seed-placed | Broadcast or Banded |
| 0-5 | VL | 20 | 40 |
| 6-10 | L | 15 | 35 |
| 11-15 | M | 10 | 25 |
| 16-20 | H | 0 | 15 |
| 21-25 | VH | 0 | 10 |
| >25 | VH+ | 0 | 10 |
| Ratings: VL = very low; L = low; M = medium; H = high; VH = very high | |||
The rates of seed placed P listed in the above table are acceptable only for beans sown in narrow rows (six - seven inches). Applying such rates to beans sown in wide rows concentrates more fertilizer close to the seed and risks severe stand reduction.
Potassium levels may be low on sands, sandy loam and organic soils in Manitoba. Each hundredweight of beans removes some 1.67 lb. of K2O. Potassium fertilizer must be placed away from the seed. Refer to the table below for recommended rates.
Potassium fertilizer recommendations using ammonium acetate exchangeable potassium (K) method.
| Soil K content (ppm in 0-6 inch depth) |
Rating | Fertilizer Potassium K2O Recommendation lb/acre |
| 0-50 | VL | 65 |
| 51-100 | L | 30 |
| 101-140 | M | 0 |
| 141-190 | H | 0 |
| 191-225 | VH | 0 |
| > 225 | VH+ | 0 |
| Ratings: VL = very low; L = low; M = medium; H = high; VH = very high | ||
Sulphate sulphur is recommended on well-drained sandy to sandy-loam soils. Sulphur distribution in the field is often related to topography, with higher levels in low areas and low levels on knolls. Soil test these areas separately to design your sulphur fertility program. Refer to the table below for recommended sulphur application rates.
Sulphur (S) fertilizer recommendations using calcium chloride extracting solution method.
| Soil SO4-S Content (lb/ac 0-24 inches) |
Rating | Fertilizer Sulphur (S) Recommendation (lb/acre) |
| 0-10 | VL | 20 |
| 11-20 | L | 20 |
| 21-30 | M | 20 |
| 31-40 | H | 0 |
| 41-50 | VH | 0 |
| > 50 | VH+ | 0 |
| Ratings: VL = very low; L = low; M = medium; H = high; VH = very high | ||
Micronutrient deficiencies are not common in most Manitoba soils. When a micronutrient deficiency is suspected, confirm the diagnosis with visual symptoms, tissue tests and soil tests.
Low spring soil temperatures may reduce iron, zinc or phosphorus uptake on some Manitoba soils, but deficiencies lessen once soils increase in temperature.
Zinc deficiency is not common, but may be related to the following factors: sandy, low organic matter soils, high calcium carbonate levels at the surface (high pH), eroded knolls or subsoil exposed by land leveling. Some bean varieties may be more susceptible than others to zinc deficiency. High phosphorus soil levels or applications as starter fertilizer may induce zinc deficiency.
Visual symptoms first appear as yellowing between leaf veins of older leaves, and whitening and size reduction in new leaves. In severe deficiencies, bronzing and necrotic spots appear on leaves, internodes are shortened and plants appear stunted. Severe deficiency can delay maturity and through aborted flowers, reduce yields. Deficiencies of micronutrients, such as zinc, occur sporadically through the field, associated with the above suspect soil conditions. This uneven or delayed ripening may cause harvest delays or reductions in sample quality.
Zinc levels in the soil can be measured using a DPTA extractant. Manitoba established soil zinc levels:
- less than 0.5 ppm = deficient
- 0.5 ppm-1.0 ppm = marginal
- greater than 1.0 ppm = sufficient
Plant uptake of zinc is greatest from broadcast and incorporated applications. However, starter-banded applications are popular among growers. Recommended broadcast rates are 9-14 lb/acre zinc as finely divided or dissolved zinc sulphate or 2-3 lb/acre zinc as zinc chelate. Foliar applications can correct in-season deficiencies.
Confirm nutrient deficiencies with soil tests, tissue tests or strip applications of foliar sprays.
Beans are very sensitive to boron toxicity, so use caution when applying boron to crops such as sugar beets or alfalfa which may proceed bean crops or avoid following these crops with beans.
Plant Tissue Testing
Consider using plant tissue testing for routine crop monitoring or diagnosis of problems. For field beans, sample the top fully developed leaf (three leaflets plus stem) at first flowering. See the Soil Fertility Guide for more details on tissue testing.
Plant tissue analysis - Interpretive criteria
Nutrient Testing
Rating | |||||
| Nutrient | Low |
Marginal |
Sufficient |
High |
Excess |
| Nitrogen (N)% | 2.4 | 2.5-2.9 | 3.0-5.4 | 5.5-6.9 | 7.0 |
| Phosphorus (P)% | 0.14 | 0.15-0.24 | 0.25-0.49 | 0.5-0.79 | 0.8 |
| Potassium (K) % | 1.1 | 1.2-1.4 | 1.5-2.9 | 3.0-4.9 | 5.0 |
| Sulphur (S) % | 0.14 | 0.15-0.19 | 0.2-0.39 | 0.4-0.79 | 0.8 |
| Calcium (Ca) % | 0.14 | 0.15-0.34 | 0.35-1.9 | 2.0-2.9 | 3.0 |
| Magnesium (Mg) % | 0.09 | 0.1-0.19 | 0.2-1.4 | 1.5-2.9 | 3.0 |
| Zinc (Zn) ppm | 9 | 10-14 | 15-69 | 70-149 | 150 |
| Copper (Cu) ppm | 2 | 3-5 | 6-19 | 20-49 | 50 |
| Iron (Fe) ppm | 14 | 15-19 | 20-249 | 250-499 | 500 |
| Manganese (Mn) ppm | 9 | 10-19 | 20-99 | 100-249 | 500 |
| Boron (Bo) ppm | 2 | 3-5 | 6-24 | 25-74 | 75 |
| Molybdenum (Mo) ppm | 2-20 | ||||
Weed Management
Field beans are not competitive, and severe yield losses will occur even from low weed pressure. Weeds may also harbour diseases that can be transmitted to the crop. Green weeds present at harvest can reduce crop quality through staining of the beans.
The most important rule of weed management in field beans is to plant into a clean field. In-crop herbicides for annual weed control in beans are limited, and effective perennial weed herbicides for beans are not available. Ensure that any fields to be planted to beans are free of perennial weeds and be aware of which annual weeds may be present, planting to beans only if they can be controlled. Crop rotation is important in determining the types of weeds present. Cereal crops offer a good opportunity to clean up fields before planting to field beans. Refer to the Weeds webpages for pictures and information for identification of different weed species.
Because of the non-competitive nature of field beans, herbicides make up an important part of the bean weed management program. Refer to Manitoba Agriculture current Guide to Field Crop Protection for a detailed description of the herbicides available for field beans in Manitoba.
Planting the crop in rows allows for the use of in-crop tillage to control weeds between the rows. Tillage should be conducted during warm days when the beans are slightly wilted, as the crop will be less susceptible to breakage and the weeds will wilt and die quickly. Do not till when the foliage is wet, as diseases can be easily spread under these conditions.
Row-cropping also allows for band spraying, which controls weeds within the crop row and reduces herbicide costs because of the reduced area sprayed.
Following is a typical weed management program for field beans:
| Timing | Management Strategy |
| June, Year 1 | Grow a cereal. Control annual grassy and broadleaf weeds. Scout thoroughly to understand what weeds are present. Use a herbicide that will NOT affect beans in rotation. |
| August, Year 1 | Consider pre-harvest weed control for perennial weeds. |
| September, Year 1 | Review the year. What weeds were present and populations? Can you control them in beans? |
| October, Year 1 | Consider applying a pre-plant incorporated treatment (Edge or trifluralin products). Be sure to incorporate properly for best weed control. May also be applied the following spring. |
| May, Year 2 | If using conventional tillage, control existing weeds with a tillage operation. Plant immediately after. If additional weeds germinate before the beans, consider a harrow operation. |
| June, Year 2 | Scout fields for grassy and broadleaf weeds. Treat with Basagran or Pursuit (pinto, pink and red varieties only) for broadleaf weeds, especially wild mustard (Basagran) or hairy nightshade (Pursuit). Use grassy herbicide to control grasses. |
| June - August, Year 2 | If crop was row-planted, conduct inter-row tillage as needed. Weeds should be controlled while still small. Be careful not to prune roots, with late cultivations. |
| August, Year 2 | Consider desiccation to improve harvestability if a large number of green weeds are present. |
Disease Management
No field bean crop is disease-free. Field beans need intensive management, including close and frequent observation (walking the field) to detect disease problem areas early. Refer to Scouting for Diseases.
Identification of diseases in the field is often difficult because symptoms can vary with environmental conditions. The Crop Diagnostic Centre can assist in disease identification. It is important that an adequate sample (generally several complete plants, including roots) be taken. The sample should include a range of symptoms from slight to severe, and supplemental information must be provided.
Diseased samples can be submitted to Manitoba Agriculture's Crop Diagnostic Lab with a submission form and can be dropped off at a Manitoba Agriculture office.
Diseases are a continual problem and control procedures must be planned for developing sustained production. Each condition that affects plant growth also affects the disease organism and the effectiveness of any control procedure. In general, conditions that favor rapid, lush plant growth also favor disease development. No single control procedure is best in every situation. Often a complex of disease interactions defies simple explanations or solutions.
Information on the following diseases in beans can be found in detail by selecting the link:
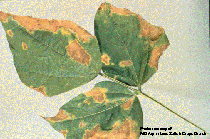
Root Rot (Fusarium solani and Rhizoctonia solani) is a chronic problem caused by several soil-borne fungi. Fusarium root rot is most common and also most serious in drought years. An indistinct brown lesion develops on the taproot and can cover all the roots. With adequate moisture, lateral roots form above the lesion. Plants generally stunted with yellowed leaves. Infected plants form fewer pods and smaller seeds. Rhizoctonia causes chocolate-coloured to dark red lesions that are much more distinct; small black or brown sclerotia may form inside the stem.
Control: Extend crop rotations beyond four years. Root rot is less severe following wheat. If Rhizoctonia is present, avoid sugar beets in close rotation. Some varieties are tolerant. Plant high-quality seed. Deep-shanking adjacent to the planter row can reduce damage. Cultivating soil around stems can encourage lateral root development but can also prune shallow roots. |
 |
Bean Common Mosaic Virus infected plants often stunted and spindly. Few pods are set and seeds are off-colour and small. Infected leaves have irregular areas of yellowish tissue inter-mixed with areas of green. Leaves may be puckered, twisted, and elongated. Plants are seldom prematurely killed and yield loss depends on time of infection. The disease spreads by plant sap contamination of wounds, insects and infected seed.
Control: Many commercially acceptable varieties have resistance to this disease. However, many strains of the virus exist and resistance may be against only a few strains. Plant certified seed. Control insects and time seeding to minimize the period during which the crop will be exposed to aphids moving in from other crops. |
 |
Baldhead - Seedlings have no growing point. Cotyledons may or may not be attached and often they are broken. A few weak stems may develop from the axils of the cotyledons. Roots may be damaged and grow poorly. The problem is caused by mechanically damaged seed. Damage is more severe on navy than on pinto beans. |
 |
NDSU, Dry Bean Production Handbook Circ. A602, Cooperative Extension Service, North Dakota State University.
Cultural Practices to Reduce Diseases
Crop Rotations (On-Farm Separation)
There is no "safe" rotation. Minimal rotations are acceptable as long as diseases and insects are not a problem. When disease loss occurs, use extended rotations of four years to non-susceptible crops. Whenever possible, avoid planting next to last year's bean field, as disease often starts in areas of fields adjacent to the previous year's beans.
Plant Clean Seed
Planting certified field bean seed that has been grown in arid regions of the country has been an effective technique for controlling bacteria blight. Although the seed is not "blight-free," it has fewer bacteria than seed produced in more humid regions. Planting common seed is a serious risk, which cannot be solved with seed treatments.
Handling the Seed
Careful handling of the bean seed and careful adjustment of the planter can reduce the amount of baldhead, a symptom of damaged beans. Damaged seed generally leads to less-vigorous seedlings.
Use Resistant Varieties
Resistance to the common blight organism is minimal, and breeders are currently seeking tolerant cultivars (lines that will yield better with the same amount of disease). Genetic resistance of most beans to white mould is also minimal, but the growth habit of the plant influences how rapidly the plant will dry. Upright plants dry faster and tend to escape infection. This explains in part why soybeans are less commonly infected by white mould than dry beans.
Proper Fertilization
Foliar application of a zinc-containing compound to zinc-deficient beans will increase yields. (Some navy bean varieties are especially sensitive to this deficiency.) Excess nitrogen can cause lush plant growth, increase the potential for serious disease and increase losses to frost. It is best to take a soil test prior to planting beans to make certain that N-P-K levels are in balance.
Row Spacing
Solid seeded bean production increases the time it takes to dry the field bean leaves and reduces the amount of sunlight to lower leaves, causing earlier leaf drop. Since white mould infections begin on dead leaves or blossoms, solid seeded beans are more prone to sclerotinia in wet years than field beans grown in rows where there is increased air flow within the canopy.
Cultural Practices - Weed Control
Besides reducing bean yield and quality, weeds can increase disease potential by causing the bean plants to dry more slowly following rain or dew. Weeds can also serve as hosts for bean pathogens.
Deep Shanking Near the Planter Row
There is some evidence that root rots are more serious if a hardpan exists. Deep shanking (18 inches) near but not immediately beneath the planter row, seems to significantly reduce root rot damage and allows roots to penetrate rapidly and deeply into the soil.
Deep Plowing
Most bean diseases do not survive long periods buried deep in the soil. Deep plowing of bean stubble soon after harvest reduces trash scatter and hastens bean straw (and pathogen) decomposition, but may result in serious erosion problems.
Insects In Field Beans
Consult the Guide to Field Crop Protection for more information on identification and control measures.
Cutworms are the larvae of several types of moths, and feed at night, cutting off plants just below the soil surface. They will attack a wide range of plants, including beans. Typically, they do most of their damage in early summer. There are many species of cutworm. Most of the larvae grow to be about one to two inches in length.
Inspect fields early in the season, every second day. When wilted, dead or cut off plants are noticed, dig around the roots of the plant to see if cutworms are present. They may be two inches below the soil surface.
Seedcorn Maggot
The seedcorn maggot as an adult is similar in appearance to the common house fly. The fly emerges in late-May and lays eggs in moist soil cracks. The eggs hatch at soil temperatures of 10°C, after two to four days. The maggot attacks a range of plants, including field bean seed. The maggot will tunnel into the seed or seedling stem. Look for thin stands or wilting plants early in the growing season. The maggot is tough-skinned, yellowish-white in appearance and about 1/4 inch long. 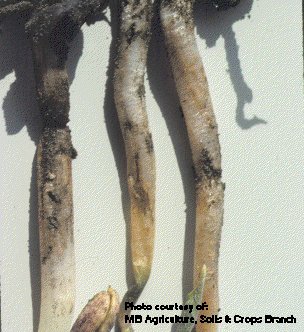
Click to expand
Damage is most severe when delays in germination and emergence occur. Early, shallow planting into a warm seedbed is ideal, but not always possible. An insecticide/fungicide seed treatment is one way to manage both maggot and seedling disease, ensuring a better chance of an even, adequate plant population. If maggot pressure is extremely high, replanting may be the only option - replant with treated seed.
Potato Leafhopper
The adult leafhopper is light green in colour, and slender. They are 1/10 of an inch long, with short, bristle like antennae. Adults lay eggs on living plants. The nymphs hatch in about 10 days. Both adults and nymphs suck sap from the veins of the plant.
By July a sufficient population of leafhopper can build up to cause noticeable damage. Damaged plants will appear stunted, and the entire plant may die.
Check plants as soon as they emerge. Placing your hand under the leaves will cause the hopper to run to the upper side of the leaf. Treatment is warranted with one hopper per trifoliate leaf.
Leafhoppers can be controlled with an insecticide. Ensure good coverage with non-systemic products.
Tarnished Plant Bug
This pest is usually not a significant problem with bean production. Hot, dry weather favours buildup of tarnished plant bug populations and increases the possibility of damage to early growth. Plant bugs have piercing-sucking mouth parts that are used to suck juice from the plant. These pests can be controlled by the application of insecticide.
Harvest Management
Reglone can be used to accelerate crop and weed dry-down. It will not hasten seed maturity but will help to maintain bean quality by reducing the amount of seed staining by green leaves. Apply when the crop has lost 80-90 percent of the leaves. Roundup can be used pre-harvest to control weeds within the crop. Apply when stems are green to brown in colour; pod is yellow to brown in appearance.
The seed coat should be developed at time of application. If the seed coat breaks apart very easily when rubbed between thumb and finger, it is too early to spray Roundup. Refer to the current Guide to Field Crop Protection or the product label for specific product information.
Harvesting Edible Beans in Late Fall
Beans are ready to be cut or pulled when some of the pods are dry and most have turned yellow. Only beans grown in rows are suitable for pulling. Seeds that are not quite mature will mature in the pod when pulled and left in the swath for several days.
Beans can also be cut or pulled just prior to threshing. Allow a minimum of one to two hours for drying time to allow moist soil to dry from the root. Cutting in the evening or morning prior to harvest is often a good practice to reduce shattering. Pulled rows should only be windrowed just ahead of the combine to avoid windrowed beans from blowing away in the wind.
Pulling and windrowing can be done in one or two operations. Pullers cut the root about one inch below the soil surface. The puller can be a fixed blade, rotary disk-type or rod weeder type. The pulled plant can then dry down for a few days. Pulled plants are then picked up by the windrower and moved into a larger swath containing several rows (six to 12 rows). Windrowing should be conducted early or late in the day to prevent excessive shattering. If the swath gets excessively wet, it can be moved through the windrowed again to fluff it up somewhat and allow air to get in and dry out the plants.
To minimize seed damage during threshing, beans should be combined when the seed is at a moisture content of 16-22 percent. Changes in seed moisture occur rapidly. Keep checking the sample throughout the day as you combine. Combining when the seed moisture is less than 16 per cent will increase seed splitting and seed coat cracking. Cracked seed coats or splits end up as dockage.
Cylinder speed should be set up between 150-400 rpm, slowing the speed down as the beans dry. Initial concave setting should be 1/2 inch front, 1/4 inch rear. Increase settings as beans get drier. Set chaffer at 5/8 inch and sieve at 7/16 inch. The wind speed should be high to remove as much of the pods as possible.
There are essentially three types of bean combines:
Special bean combines: Like a Bedwell or Lilliston, are used exclusively in beans. They have two or three cylinders and the underbelly of the unit are all screens. Beans are moved around by conveyor and are dumped off the combine, not augured. They yield an excellent product under hot and dry conditions as they are very gentle on the crop. They are well suited for combining high valued coloured beans.
Rotary combine/conventional combine: The action of a rotary combine tends to cause less impact on the seed and subsequent seed cracking than a conventional combine.
By keeping the rotor full (which can be a challenge) the beans tend to cushion each other, resulting in a gentler threshing action. If you have to dig in the dirt to pick up the swath, beans can be tough on a rotary combine as the dirt can cause excessive wear on the rotor. Conventional combines are also effective in threshing beans, although care must be taken to ensure a quality harvested product. Combining beans also takes time. If you only have one combine, using it to harvest beans for a week or two means other crops are not getting harvested. A SUND pickup will make picking up the windrow much easier. A flex header can also be used for direct harvesting beans.
Modified conventional combine: Set up exclusively for beans.
Modification starts with replacing the rasp bar cylinder with a spike tooth cylinder. This provides gentle separation of the seed from the pod. The cylinder drive pulley should also be changed to allow for slower rpm's. Install screens at every possible location. The main function of the screen is to allow for as much dirt and foreign material as possible to shake out.
The best place to start is in front of the cylinder, under the feeder. Dirt coming up the feeder will shake through the screens and avoid smearing onto the beans. Screens placed under the clean grain auger, the return and under the unloading auger all help in eliminating dirt in the sample and maintaining bean quality. Often, the return auger is not used. The final operation is the installation of a SUND style pickup or a flex header.
If you are harvesting beans for the first time, a rotary or conventional combine will do the job. If you plan to continue growing beans, having a combine dedicated for beans will likely be more profitable in the long run.
Handling and Storage
Beans have a thin seed coat and need to be handled gently to minimize damage to the seed. Small hairline cracks to the seed coat will discount the product as these small cracks will widen when processed making the beans unappealing to the canner.
Beans are often stored and traded at 17 percent seed moisture content, but are considered dry at 16 percent. Aeration can be applied to seed harvested between 18 -20 percent seed moisture content. Drying beans below a seed moisture content of 16 percent makes the seed coat more fragile and susceptible to cracking or splitting when handled. Beans can also be discounted if they are too dry (<15 percent seed moisture content). When beans are stored on a flat surface, rake the surface of the pile periodically in the winter time (once per week) to avoid surface crusting and sealing in moisture. A build up of pods and soil near the top of the pile will make this problem worst. Any mold should be removed from the bin before loading to avoid mixing the mold with the rest of the beans.
Beans should be moved with a belt conveyor instead of an auger. Belt conveyors work with elevated bins, hopper bottom bins or when the seeds are on a flat surface and scooped into a belt conveyor. Beans can be safely stored on a concrete floor, but avoid dropping the bean from heights greater than a few feet.
Avoid contaminating the seed with foreign material, especially corn and pea seed which can be difficult to separate. Ensure trucks and storage facilities are thoroughly cleaned.